Dynamic content: Your secret weapon to creating awesome projects (fast!)


Dynamic content is an essential feature for no-coders who want to build faster, smarter and create easily scalable projects.
Builders that work with dynamic elements don’t manually add new building blocks every time they want to update their web project — they simply add a new database entry and click save. Their website is then automatically updated!
Dynamic content is used all over the web. It’s how blogs and product description pages are built, and how companies are able to show “You might like this as well” recommendations below products and services.
The more content you have on your website, the more it makes sense to use dynamic content (unless you enjoy tedious, repetitive work). But for small websites, the benefits are undeniable as well. For starters, scalability. Secondly, it’s much easier to tell a colleague to update a database entry than to go and build a new section on the website.
In this article, we’ll focus on three simple examples to give you an introduction to dynamic content. Ready, set, build!
The difference between static and dynamic web pages
Let’s sketch a scenario first. Imagine you’re tasked with building your company’s ‘about’ web page. You might draw a mock-up of the elements needed for the page. Then you open Ycode and start adding each element to your blank canvas.
First a header section, then a paragraph… plus some image elements. Everything's coming together nicely!
At the end of the page, you’d like to display the names and pictures of all team members. The team currently has 20 employees, but with your company’s ambitious growth goals, this number will surely triple by the end of the year.
To build the team member section, you have two options:
Add a heading (name) and image element for each person and repeat this action whenever a new person joins the team.
Build and style a heading and image element once, connect it to a team member database in the settings and automatically update the web page every time you add a new member database entry.
Option 1 is simple, yet time-consuming (and a little old-fashioned). This is a static website approach.
Option 2 makes building and maintaining the page a whole lot quicker, and easy for anyone to update! This is how dynamic elements work.
As you might have guessed, dynamic content is the favorite method of nearly every web builder! This is why…
Dynamic content:
Grabs data from a database and shows the information in real-time
Helps you to build web pages faster and more efficiently
Separates the content from your website (fewer chances to mess up the web design)
Allows other not-so-tech-savvy people to contribute to the website’s content
Makes it much easier to personalize content for visitors
➜ Click to read the Ycode documentation on dynamic content
Dynamic content can be used in a variety of ways on your website. Let’s dive into three examples.
3 examples of dynamic content on web pages
To see how all these dynamic content elements can beautifully work together on one page, we’re going to use our imaginations again. Let’s pretend we’re creating a website for a fictional food truck. We’ll name the joint Tres Tacos. 🌮
Can you tell I’m in Mexico and wake up every morning thinking “Can I eat tacos already?” Because I very much do.
Anyway, let’s give this taqueria on wheels an online presence and start building our Ycode dynamic website.
Example 1. Featured header slider
Al pastor, campechanos, chicharrón, cochinita pibil… if you’ve watched the Taco Chronicles, you know there are many different types of tacos. Our restaurant runs two new specials every week, which they want to proudly present in the website header section.
Preparation: Read the grid documentation.
Let’s build!
Let’s start with a blank canvas that just contains a Body layer
In the top panel, open the Square icon menu and add a Section
Click on the Cursor icon in the top panel and add a Slider from the menu
When working with dynamic content, you only need to design one slide. Delete the other slider elements by selecting a Slide in the Layers sidebar and hitting the Backspace button
Now design the slider however you like (see our example below, using a grid)
Connect dynamic data
Create a new local database (we named it Tacos deals). Then add your data manually or import a data file, then save everything
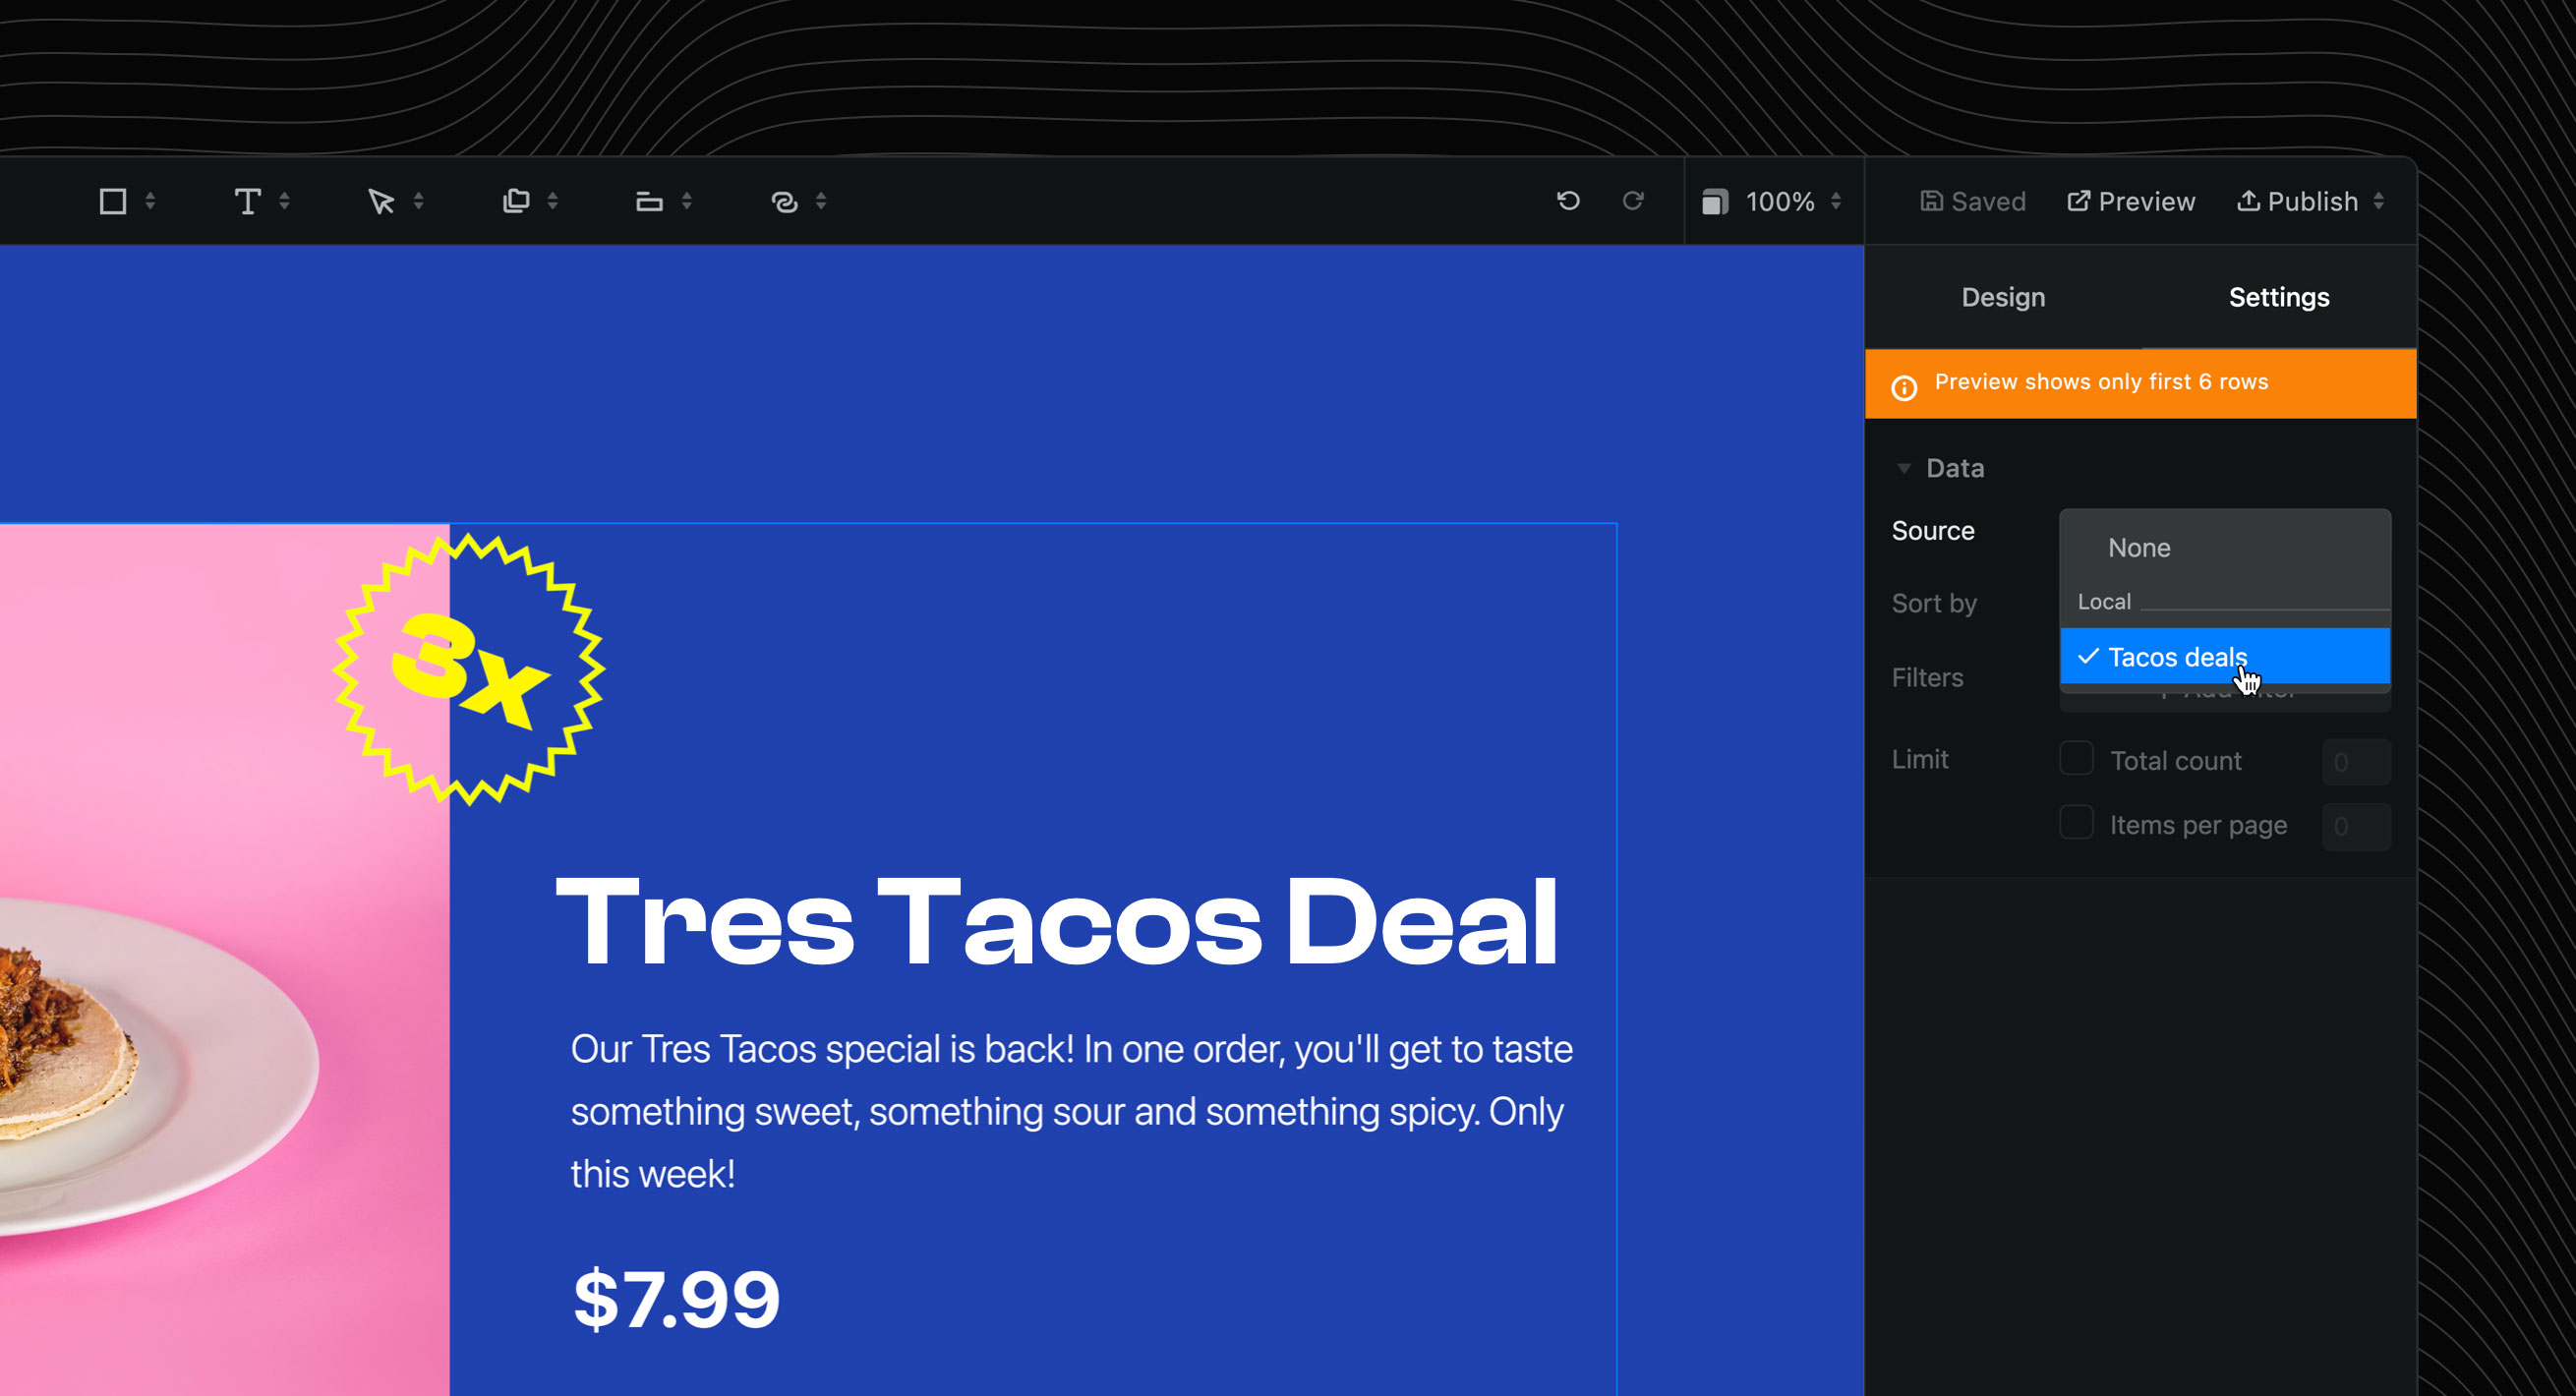
In your canvas, select the Slide layer and navigate to the Settings tab on the right
As the Source ID, pick your newly created database
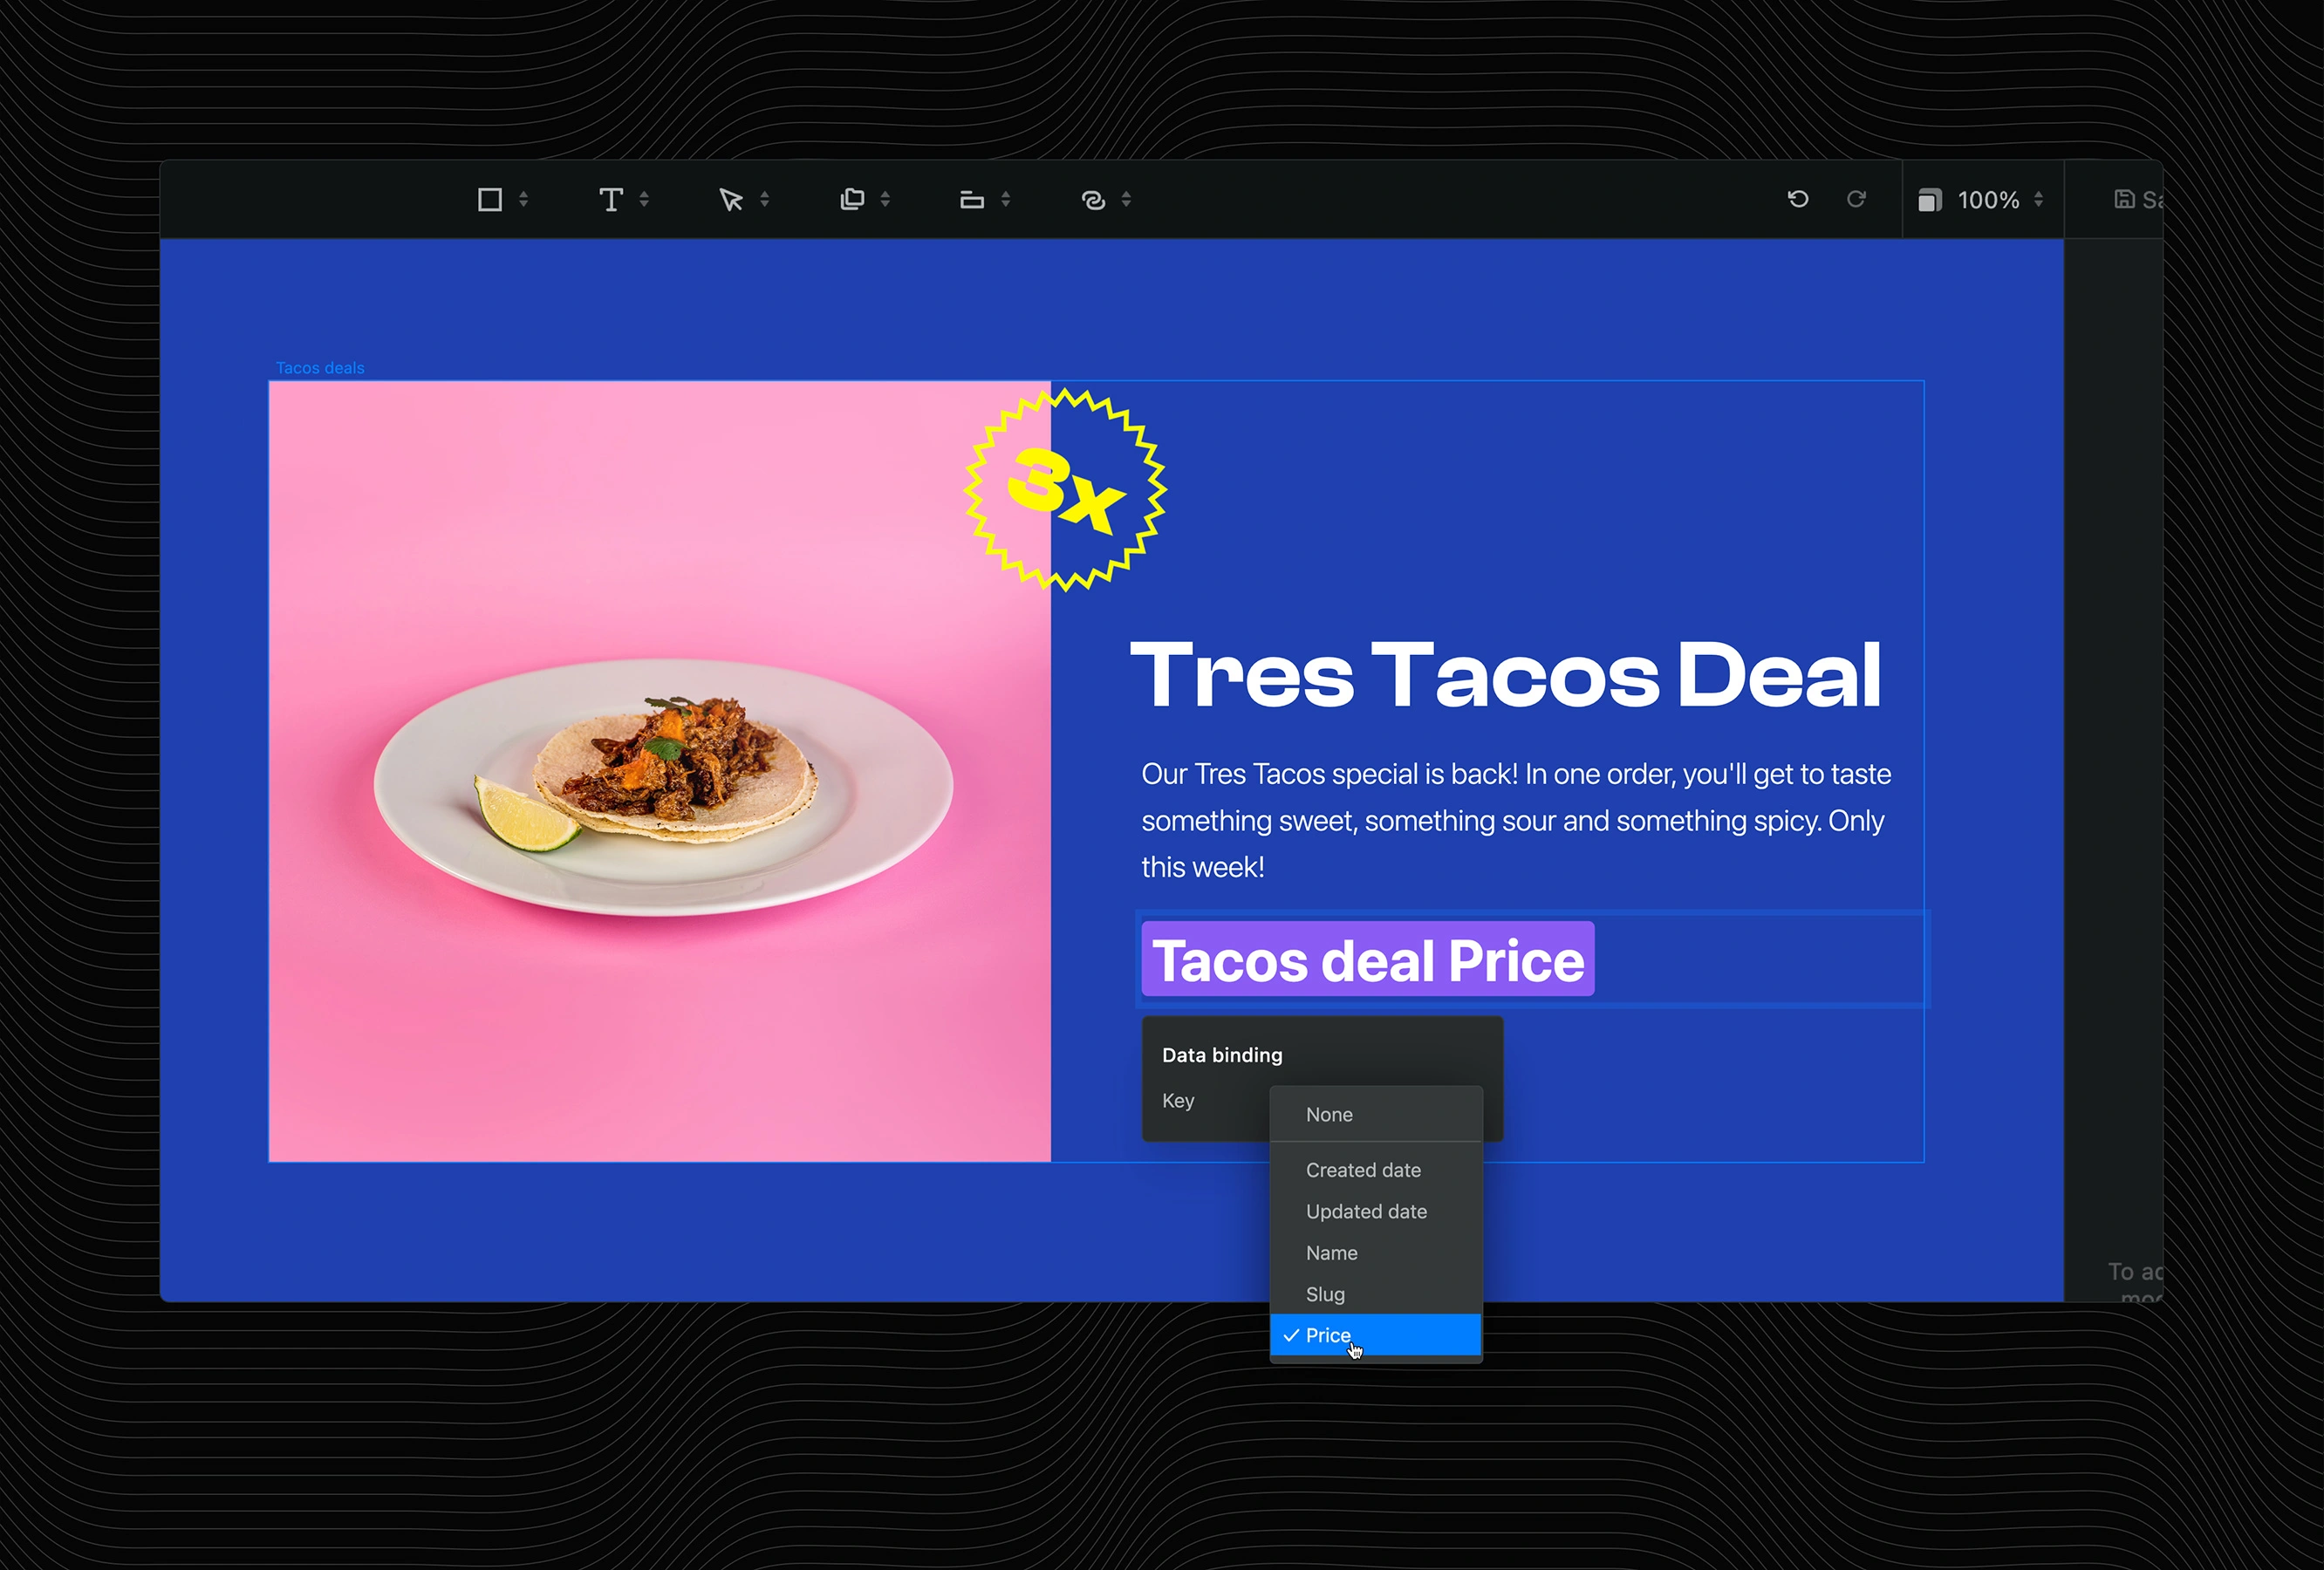
Now select the corresponding layers (image, title, description and price) and connect the right Data key in the Settings tab
Click on Save and Preview to see the slide in action

Example 2. Locations
Our food truck moves around quite a lot. To keep customers up to date about their location, there’s a “where to find us” section on the website. To show current locations, there’s no need to edit the elements on the website itself.
Instead, employees can simply add a new table entry and add the new city name, address and opening hours. By linking the website elements to this table, the latest locations will be automatically shown on the website.
Preparation: Read the grid documentation (if you already read it when preparing our previous example, you can skip this and start building).
Let’s build!
Below our slider section, add a new Section
Add a Grid and delete two grid item layers, so only one remains
In the Design tab, open the Layout section and set it to 3 columns
Inside the grid item, add an Image, Heading and two Inline text elements
In the Design tab, open the Grid section and adjust the gap size to create space between the elements
Connect dynamic data
Create a new database (we named it Restaurants) and add your data, then save
Back in the canvas, select the Grid item layer
In the Settings tab, assign the database as the Source ID
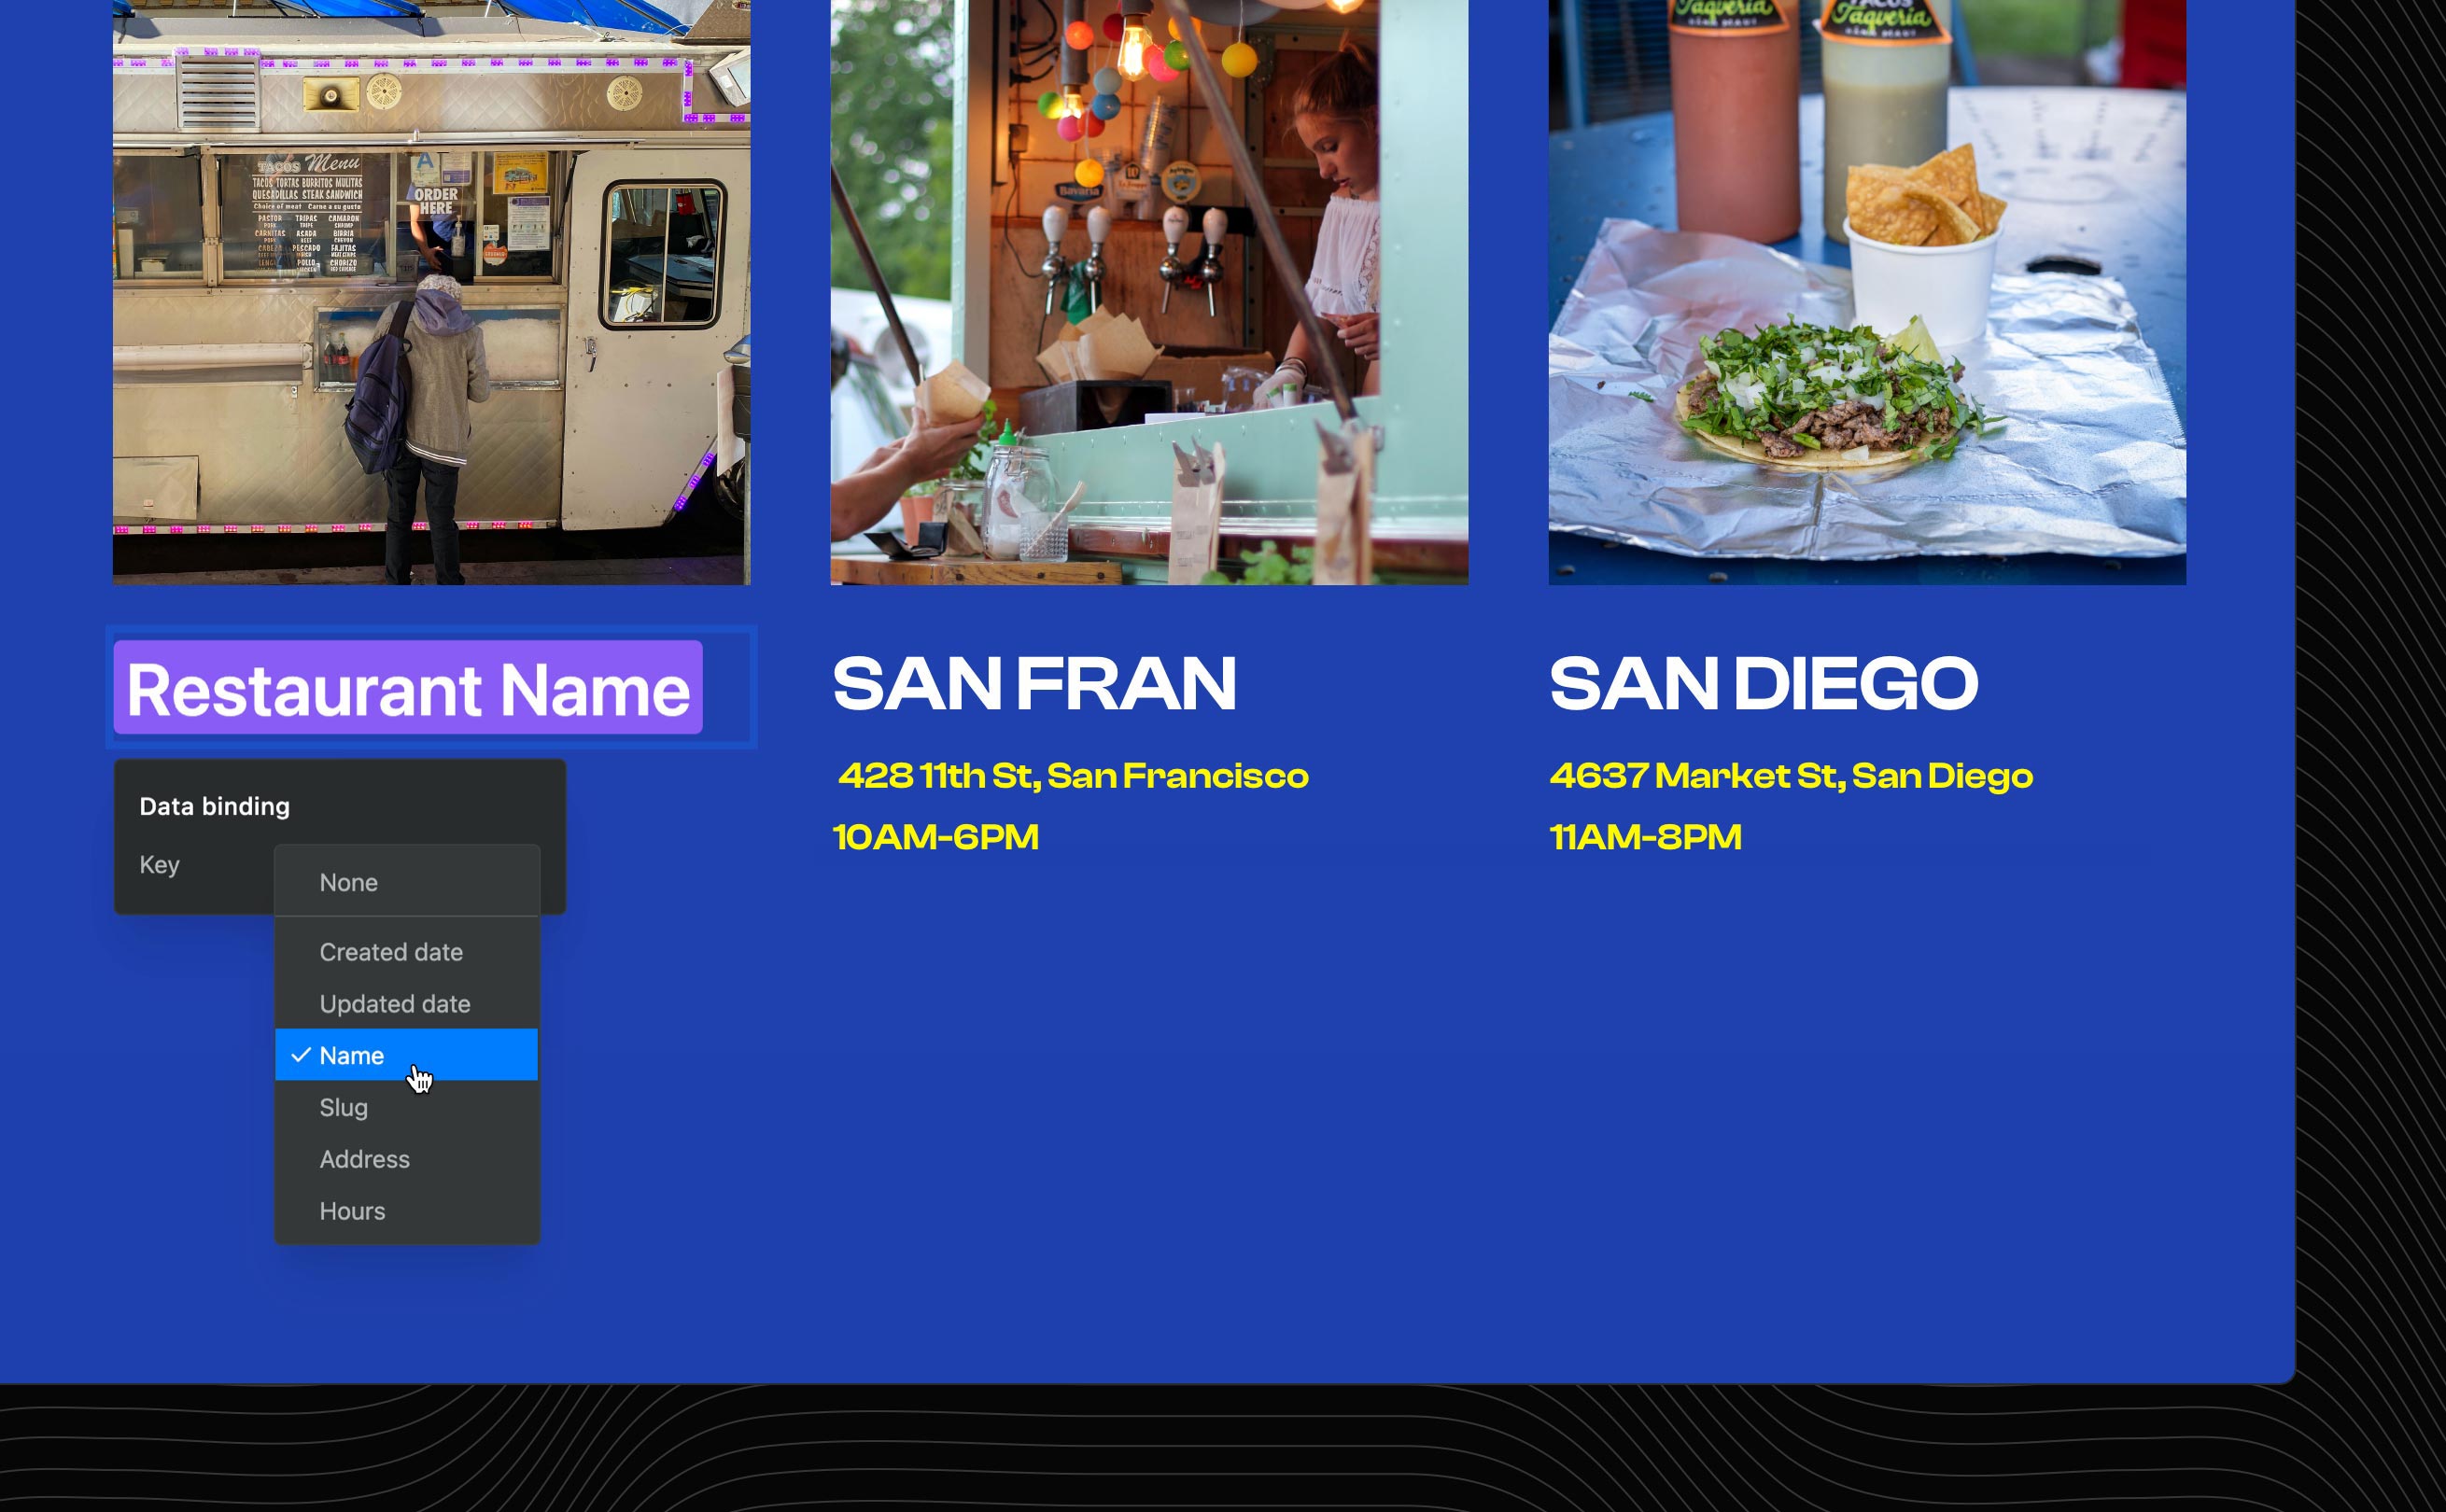
Then connect the image, headlines and inline text elements to the corresponding Data keys

Example 3. Testimonials
Now, of course, our taco truck can rave all they want about their mouth-watering tacos, but people are much more prone to believe other people’s taste buds. That’s why it’s important to have a selection of real testimonials displayed on the website.
To create this part, we need another section and a new Ycode database.
Let’s build!
Below our location section, add a new Section
For our testimonials, we will use another grid element. Insert a Grid element from the top panel
In the Design tab, open Layout and set the column count to 2. We also set the gap width to 12
Delete the three grid items and leave just one, this is the one we’ll connect to the dynamic data
In our example, we added a quote icon (icon element), paragraph element and below that a div block with an image and heading. For the image, the border radius is set to Full to make the shape circular (Design tab, Borders and then Radius)
Using Transforms in the Design tab, we then moved the image up and to the left
Connect dynamic data
Create a new database (we named it Testimonials) and add your data, then save
Back in the canvas, select the Grid item layer
In the Settings tab, assign the database as the Source ID
Then connect the paragraph, image and heading to the corresponding Data keys

How will you use dynamic content on your website?
You might have already realized this from the website sections we’ve just built, but once you know how dynamic content works, it’s not that difficult to apply the same steps to different elements.
You can also use dynamic content to build things like:
Blog posts
Blog overview pages
Team overviews
Product descriptions
Archive pages
Listings
… and more!
In our Tres Taco example, we used the Ycode local databases, but you can also connect your project to Airtable data using our native integration. Click to read more about connecting Airtable to Ycode.
To finish off strong, we’d love to know how you end up using dynamic content in your Ycode projects.
Showcase what you’ve built in the Ycode community!
Get your project started today
Discover our intuitive visual editor, use built-in CMS collections, SEO features and launch your web projects with ease.
